Secret Stash - Motorcycle Jackets

9.27.2013


Secret Stash is back and today we're gonna talk about my current garment obsession, Motorcycle jackets. I just can not get enough of them, in leather, in wool, with studs, with crazy zippers.  My pinterest inspiration board just keep getting bigger and bigger!
1. Burda Biker Jacket 135 in Lipstick Stain wool flannel coating from Gorgeous Fabrics. First of all, how sexy is that color name? Mmm yeah, gonna get me some Lipstick Stain and wear it in the middle of gray winter. You can't break me Old Man Winter cause I got my red coat on! *Sashays into a snow drift*
-Spoiler, I'm sewing this pattern (sadly not in red) and it's well drafted with some fun details.

2. Style Arc Prinnie Jacket in Copper faux leather. Oh yes, just think now nice you'll look with that draped front in shiny shiny faux leather.  Like an alternate world Statue of Liberty, but you know, stylish.

3. Kwik Sew 3764 in snow leopard stretch denim from Marcy Tilton. Pay no attention to the frankly horrible sample garments, I've seen this sewn up by women with better style.  Make it up in some stretch denim for a lightweight jacket for the fall. Meeeeow!

Bonus pattern - Seems one of my favorites in the mental catalog, Simplicity 2056, has been taken out of print.
You can still buy it from the Simplicity website or ransack your local JoAnn's. Pay no attention to me as I hover behind you waiting to rip it out of your hands. Score!

P.S. - If you feel like casting a vote for me in the Mae contest just click your way over here. The red bird and I say Thanks!

Theme Sewing - Oliver + S Raglan Tee

9.25.2013

You know what I really like about the Stashbusting Sewalong?  It's that they let me sew whatever I feel like. Which is good cause, "this bird you can not chain."  But Emily and Cindy are smart and know that sometimes a sewcialist might need a little inspiration. So they come up with a stashbusting theme each month that you can chose to sewalong with.  Half of the time I blithely ignore this and go on cutting out fabric while singing, "I did it my way."  "Regrets, I have a few, but you can't tell me what to do...," wait I don't think that's how it goes.

Annnnyway, this month the theme was sewing for children and you know what, I have a child! Also a smallish stash of children's fabrics that he'll grow out if I don't get cracking. I was most concerned about a cool space invader print that was only a 26" x 24" piece.  Since good boy knit prints are hard to come by, I'd snapped this wee piece up two years ago. It needed to be sewn up and quick!
Don't mind me, just pushing this it flickr.
Enter Oliver + S Raglan and Field Trip Cargo pants.   I made the pants for my nephew last Christmas and had a sewing disaster that forever scarred me. (Cut hole in almost done pants. Then had to rip out a shit ton of top-stitching to replace panel. It was black on black top-stitching...at night...in November.")  Just seeing the pattern made me want to hiss and yell, "The power of Christ compels you!" Thankfully I pulled it together and remembered that A- it wasn't the pattern's fault and B- we're just doing the easy knit shirt this time, so chill Heather, chill.

Desmond is currently wearing 3T, so I went with the 4T size for more growing room.  I also checked the pattern against some RTW 4T shirts and decided to add 1" of additional length to the shirt.
Using it for the sleeves is probably better since the print isn't square.
My original plan was to use the space invaders knit for the body, but there wasn't enough fabric and the damn print turned out to be off grain.  Oh well, I had plenty beefy black cotton/spandex laying around.  That would work for the body and the raglan sleeves would help disguise the skewing of the space invader print. Then red ribbing for the neck finish, cause everyone likes a nice pop of color.  Tadaaaaa.
And we're done. #sewing
Sewing the pocket is the trickiest part.  I used a straight stitch on the regular sewing machine with my edge stitch foot.  It took a couple of tries to get the stitches an even distance from the edge, but the sewing goddess smiled and made it happen.
The rest was all easy serging and a little coverstitch hemming. Oh toddler T-shirts, you are the best FO, I feel like making 20 of you.  The Oliver + S pattern and I are in a good place now, but someone stop me if I ever think about making woven toddler pants again.
Shhhh Mom, I'm taking care of the pictures myself.
Master Desmond said, "Robots Mommy, Robots!"  I told him they're aliens but he just shook his head cause everyone knows Mommy is crazy. "Robots it is, now let Mommy take your picture."  He then stole the camera and I had to grab some shots with the iPad. Here he is looking angelic right before he started licking my camera lens. Kids today and their propensities for licking technology!
This may be the only way to get pictures of him in the shirt.
This is the best shot modeled shot I could get cause the boy's got things to do, like take pictures of his lips while ignoring my shouts to smile for Mommy's iPad.  Good news is that the shirt fits him pretty well and he really likes it.  Bad news is when I have to take it off of him he gets pissed. "No my robot, MINE!!!"  Ahhh aren't they precious? Be nice to Mommy our she will steal your shirt and wear it as a hat. Yeahhh I'll make that look good. Phew, phew, phew, got you space invader.

My Sew-A-Long Mae

9.23.2013

What do you get when you cross polka dots, birds, and my favorite color red?  You unlock triple amounts of awesome that make up my sew-a-long Mae.
I had to take part in the Mae sew-a-long cause A - I like this pattern, B - chance at prizes, C- I bought a card of bakelite buttons that had just the right number for Mae.
Changes to this version.
1. The neckline is the one Abby drafted and not my modified larger one. They both look good so why not switch them up.
2. Took off the extra ease I'd added in the sleeve area during my lazy fix adding extra east to the entire side seam.
3. Increased the width of the button placket an 1/8" because these buttons were a bigger and I needed more width for the button holes
I also underlined this version with some siri lining, because you could clearly see the black polka dots through the white areas. Facing shadows, no thank you!  Putting in an underlining is a pain, but you do get the added bonus of being able to sew down all those facings.  I whip stitched down the armhole facings since sometimes they want to flash people. Dirty, dirty armhole facings.
The fabric is from Gertie's Etsy store this summer, a cotton with a touch of spandex in it. The underlining cancels out the stretch factor but that's OK, I've got enough ease to be comfy.
Also from Etsy the cute embroidered felt bird patch.  Check out Dahlia Soleil if you're looking for something like this.  She has many different designs - plants, animals, etc and you can chose from different colors of felt. I ordered an iron on patch but ended up hand sewing it on for a more vintage look.
"Tweet, tweet, I'm making your blouse that much more awesome." Right you are red bird, even the 3 year old thinks you're the bee's knees.  Already got complements in this version while running errands, so all around a great make. Hooray for Mae!

Hemlock

9.19.2013

Just a quickie post to say I made a Grainline Studio Hemlock and then took goofy photos of myself in it.  It's a really simple pattern that you can serge together in a couple of hours.
My hemlock is the exact same measurements as Jen's but with my bigger body dimensions in it - Bust 38, Waist 34, Hip 42.5.
I did cut the sleeves down to 3/4 length, drop the neckline 1" at CF and make the neckband 1" larger than suggested. Cause I have to tweak patterns to get my kicks.
The fabric is some mixed animal print burnout I've had in the stash.  I'm wearing it with a black tank so as not to knock you over with my super sexiness...yeah that's it. But I will knock you over with my finger guns. Phew, Phew!
I think the hemlock is gonna be a cute layering piece with skinny jeans and jackets for the fall. Or maybe I'll just throw it on with some yoga pants for answering the door with the UPS man needs a signature. I wonder how he feels about finger guns?  Phew, Phew!!!

(P.S. Some other bloggers you know made hemlocks tees as well.  You might want to lurk around crafting a rainbow and threedresses for their take on this pattern.)

Bluegingerdoll Pencil Skirt Hack

9.17.2013

Hi ladies, it's time for a little pattern hacking or as I like to think of it "pattern drafting light."  Cause why reinvent the wheel if you've already got a pattern with the fitting kinks worked out? I'm preaching to the choir, right? Right!

So the back story here is that I found myself with the burning desire for a denim pencil skirt, all because of a twitter conversation. (Those of you who are to blame know who you are.) I'd just finished the sheath version of the Billie Jean dress and the skirt part was the perfect starting point for my idea.
Basically I wanted to keep the same shape of the skirt, but give it a little visual interest by adding decorative seams with top-stitching.
This change couldn't be easier to do, you just convert the waist darts into princess line seams. Since it's your lower half you don't even have to worry about pesky bust points and what not.

So here's a quick how to on how to hack the Billie Jean dress.
1. Draw a straight line from the bottom of the skirt dart down the entire length of the skirt.

2. Cut the pattern apart on the line and along one leg of the dart.

3. Cut off the rest of the dart on the other side of the skirt.

4. Added seam allowance to both sides of the new seam line, give the pattern piece new names, and you're finished!

You'll need to cut out 1 center front panel on the fold and 2 side front panels for the front. For the back, same thing but of course 1 center back panel on fold and 2 side back panels.  Sew your side panels to the center panels, press the SA to the side and top-stitch the seam lines.  Sew up the side seams and then give it a try on.

After sewing up all the panels you might decided the waistline was a bit high for a skirt.  Personally I like my skirts to ride below my natural waistline, so I cut down the pattern  1 1/2" and then drafted a curved waistband. The skirt is closed in the back with an invisible zipper and hook and eye.
The vent and hem were finished with the same to-stitching as the princess line seams.
And there you have it, one stretch denim pencil skirt added to my/your wardrobe.  Now go out and be fabulous.

Pattern Drafting 101 - Curved Waistbands

9.13.2013

Hello everyone, are you ready to go to pattern drafting school? Yes? Well get out your rulers and your pencil boxes cause today we're gonna talk about curved waistbands.
Curved waistbands are the way to go if you prefer your garments to sit at a point lower than your natural waist. They are also a godsend for us curvy girls who just have a "steep hill" to cover.  (Yeah I'm talking about my big round hips) The added shaping in the side seams area means the band will sit flush against your body, instead of standing out the way a straight waistband would.  Of course drafting a curved waistband takes several more steps then a drawing a straight rectangle, so some pattern makers will just take the easy way out.  Or if you're like me, you might be hacking a pattern into a new garment and need to create your own waistband.  

Luckily drafting a curved waistband isn't hard to do, since you are essentially following the curves already established in the main skirt.  All you need are some instructions...so on to the fun part.

Tools needed - Trace paper, clear ruler, writing utensil, scissors and your front and back skirt pieces with the seam allowance marked on the waist area. I will be using my bluegingerdoll pattern hack pencil skirt for the example. This skirt has CF/CB pieces and Side front/back pieces.

Steps to Draft a Curved Waistband
1. Starting with your front skirt pattern, pin/tape any center front and side front pieces together at the seam line.  If it the skirt has darts pin/tape them closed.
Two Piece skirt
Skirt with Darts
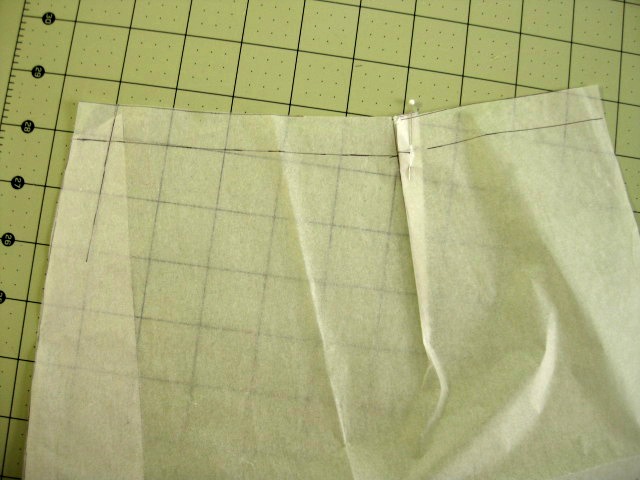
2. Place a piece of trace paper over the waist area and trace the waist seam line. Not the pattern edge, you don't want to add any seam allowance yet!
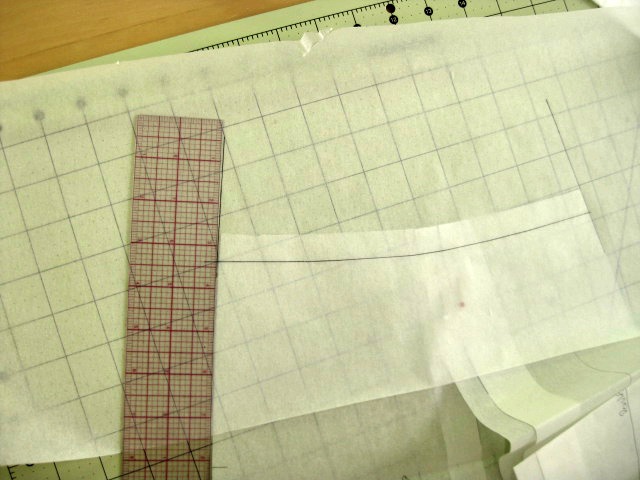
3. Now using the skirt's edge as a guide for the angle, trace in the side seams of the waistband. In this picture I've laid my clear ruler up against the side seam of the skirt. The idea is that you are extending that angle upward.
Now your waistband should look something like this. It's good to label your CF or CB now so you don't get confused.
4. The next part of the waistband we're gonna draw is the top seam line.  But first you have to decide how wide you want the waistband to be.  You probably want to keep it somewhere in the 1" to 2" range for a normal/non-design element waistband. My example waistband band is going to be 2" wide.
Now taking the clear ruler, place it on the bottom seam line to use it as a guide for tracing the top seam line.
Slowly pivot the ruler along the bottom seam line to trace the top. In this pic I've trace a few inches of the curve at a 2" width. 
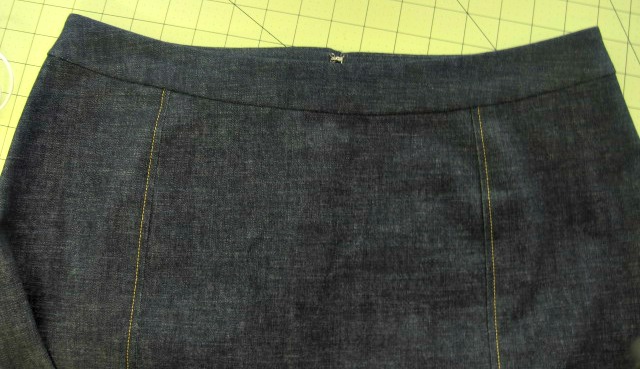
Finished pic - I've drawn in the side seam allowance and added FOLD to the center front since my zipper is going in the back. If you were making a skirt with a fly zipper in the front, add seam allowance to the CF as well.
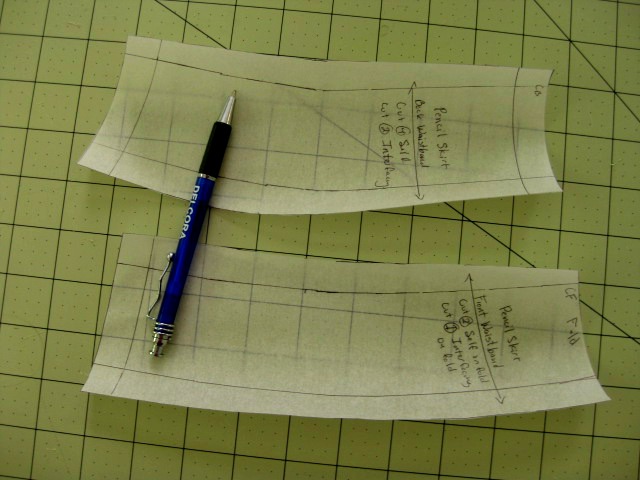
5. Next use the clear ruler to add seam allowance on to both the top and bottom of the waistband.  I've put the standard 5/8" SA on this example.  Then use the CF as a guide for the grainline and label the pattern as necessary. (My waistband has the pattern name "Pencil skirt front waistband," on it and also has the cutting information, "cut 2 on the fold self, cut 1 on the fold interfacing.")
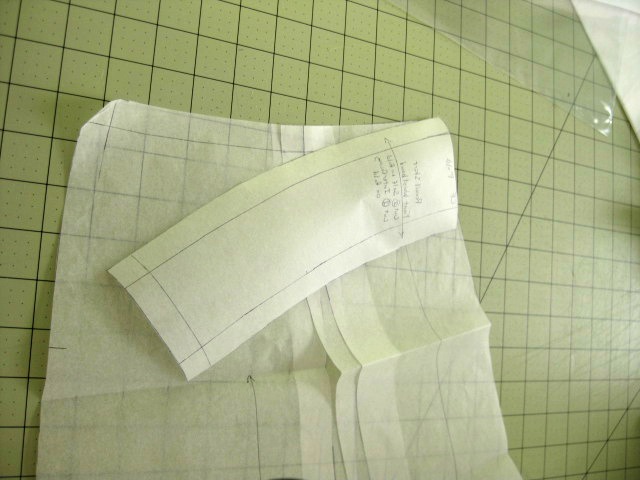
6. Cut out the waistband pattern and bring over to your front skirt pattern.  You'll want to "walk the seam" to make sure the two pieces will fit together when you sew them.  
Turn the waistband like I have it pictured here (how you're going to sew it on) and match the two seam lines on one end.  Then slowly pivot the pattern along the seam lines matching them up. "Walk" the pattern all the way down the seam line and if they are both the same size then perfect!  If not then add or subtract from the waistband so that they are the same size.
7. Repeat steps 1-6  to draft the back waistband.  If you are putting the zipper in the back, add seam allowance to the CB seam.  If the zipper is going on the side seam then mark the CB as FOLD like you did the front.
Make sure the two side seams are the same width and you're done!

Remember to test for fit with a muslin before cutting your fashion fabric.  If the waistband still stands away from your sides you can take it in at the side seams and then adjust the angle on your pattern.

Cut facings and interfacing like you would on any commercial pattern and finish it with your favorite technique. (I've hand tacked the facing down on my example.)  On this type of waistband I usually close with an invisible zipper in the center back or side seam like so...
If you wanted to instal a fly zipper in the front you'd need the additional pieces of the fly and fly shield.  Let me know if you guys are interested in how to draft that.  In fact if you're interested in learning how to draft any particular pattern piece, I'd be interested to know.

This post got a little long so I'm gonna split out my bluegingerdoll pencil skirt pattern hack into another post. See you guys next time and happy drafting.

Hey Baby, Nice Buttons - The Mae Blouse

9.11.2013

Hello All, once again I'm strutting around in some vintage inspired goodness from Bluegingerdoll. This time it's the new Mae blouse.
After my love affair with the Billie Jean dress, it should come as no surprise that I jumped on the pattern as soon as it was released.  I have a bit of a thing for scalloped details on tops so that pretty much sealed the deal. Scallops are detail I find very pretty and I can actually wear without looking like a grown women trying to dress like a 6 year old. (Yeah I'm looking at you peter pan collars.)
So I bought the pattern and then bought new fabric instead of going into the stash.  GASP, don the ribbons of shame! But really I couldn't help it cause Mae is the perfect pattern for a 2-2.5 yard cuts of 36" vintage cotton.  The kind of cotton I might be amazing a small stockpile of. (It's vintage and pretty, Wheeee! I love you Etsy.)

Pattern
Mae button back blouse from Bluegingerdoll.

Fabrics used
Some vintage quilting cotton purchased off of Etsy.  Strawberries on a navy background. How could I say no? This was a 2.5 yard cut of 36 wide cotton and I was able to cut out the larger size of the pattern and still have some left over.

Pattern changes/alterations
1. I started with the same 12/14/16 that I used with the Billie Jean dress.  Shoulders 12, waist 14, hip 16, and traced the size 14 dart. The muslin was the right shape for my body but was too tight through out the torso.  Decided to do a quick fix of adding 3/4" to the entire side seam.

2. Did my normal 1/2 forward shoulder adjustment.

3. Cut the neckline back 5/8" by tracing pattern edge of the upper scallops and making the ones in the center larger.  I adjusted the back neckline at the shoulder to match the front but did not make the back neckline lower.  The facings were then adjusted to match the new neckline.

Confessions/Advice
1. Since this was my first time ever making any kind of button back garment I actually read the directions.  Then my brain was all, "I don't want to assimilate this new information," so I had to remind it who was the boss.  And bribe it with cookies.   The silly thing is that it's really just the same as putting buttons in the front but my brain was all Duhhhh?

2. Way back in 2009 when I made my first garment with scallops, I found marking the valley between each scallop really helpful when sewing.  That way you know exactly where to pivot the needle and your scallop size doesn't get all irregular.  You can mark the seam allowance directly on the fashion fabric with a clear ruler and a disappearing marker/chalk.

3. Instead of clipping all the curves on the neckline, I graded the seam allowance and just clipped at the valley point.  This technique also worked well for getting the scallops to look nice after pressing.
4. The buttons in the back stop about 5" above the hemline so you get some extra hip ease when moving around.

Husband Comment
"Hey this has vents, no wait they're buttons.  Are these supposed to be on the back?"

My Final Thoughts
This was a fun little project other than my routine cursing at the buttonhole attachment. (Some day buttonhole attachment, bang zoom straight to the moon!)  The neckline takes little time to press nicely, check Abby's blog for details, but other than that zoom zoom and you're done. It's a cute little number and I'll be sewing another one for the sew-a-long....which starts today. I better hurry up and pick a fabric!

P.S. I've paired the Mae blouse with a pencil skirt that was hacked from the Billie Jean dress.  Next post I'll show you the changes I made and how to draft a curved waistband. Ohhhh exciting...maybe.

Proudly designed by Mlekoshi pixel perfect web designs