Bronte in Blue - with Bonus Fitting Info

6.28.2014

First a quick thank you about the Martini/Bellini post. I was afraid that my normal practice of answering in the comment section might mess up the rafflecopter counts for the give away. I appreciate your feedback and big internet hugs to you all.

Now on to the real meat of this post, Jennifer Lauren's Bronte pattern.
My socks were knocked off when upon seeing this pattern. The vintage 40's shoulder detail really rocked my world and doing it in a knit fabric was a stroke of genius.  I bought, downloaded and traced this baby the day it was released.  The pattern was muslined and it seemed to fit great.  So off I went to make a real version out of some striped Lillestoff and that's when the shit hit the fan.

Yes it was the dreaded, "real knit fabric behaves differently than the muslin fabric."  Sewing Goddess, why have you forsaken me? Sewing Goddess said, "Snitch please, you know what you did wrong." Oh yeah, was it muslining in a different weight knit? Or was it using a wild print that made the fitting problems hard to see? Was it both things? It was both things.  My gut then yelled, "I told you not to do that, but did you listen? NOOOOOO. Think you're smarter than me? Nobody's smarter than me!"

Ok, Ok, you two. I get it, I screwed up this time. Excuse me while I don the ribbons of shame to figure out what my fitting problems are. My gut yelled again, "It's your forward shoulder, like I told you the first time. What are you deaf?" God, why is my gut a surly old man? Dude needs to mellow out. Anyway my gut was correct that my forward shoulder was a good place to start. Long story short, I had to flex my brain muscles and knock out a few more muslins before figuring out the entire fitting problem.  More on that in the fitting section. Let's look at pretty pictures first.

My final version is in a lovely royal blue bamboo knit, a little darker in real life.  The white polka dots are 3 dimensional ink that's been painted on. Kind of like 80's puffy paint, but a little classier. (Please tell me that some of you also had a puffy pant stash.)
Bronte/pencil skirt combo is my favorite. Better put a black denim pencil skirt on the top of the sewing list.

The shoulder detail and I are still having a torrid love affair.  Ahhhh look at the cute flower buttons that were in the stash.  Not knitting baby sweaters in a timely manner finally paid off. There were only 5 on the card so I put 4 buttons on the top instead of the suggested 6.
The buttons also anchor the top overlap so that it doesn't slide backwards on the shoulder. Or at least they do on me.

Pattern
Bronte from Jennifer Lauren Vintage  I made a combo 12/14.

Fabrics used
Polka dot bamboo jersey from Marcy Tilton, but you can get it a few bucks cheaper for Harts. Harts also has this fabric in a number of other colorways.

Pattern changes/alterations
Here's a breakdown of my fitting problems with a little photo assistance.
The biggest problem was the very noticeable drag lines from the bust up to the shoulder overlap.  I also had drag lines coming over the shoulder on the back piece and excess fabric wadding above the bust.

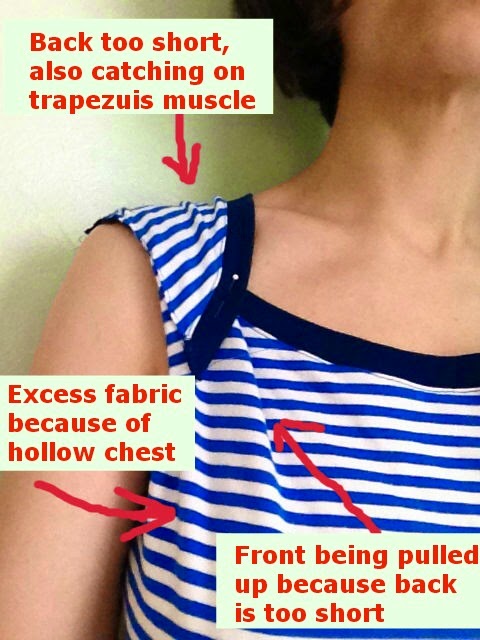
So what's causing all of this?  It's combo of a forward shoulder and a hollow chest.  The shoulder juts forward causing the back length to be too small, which in turn pulls the front up. Meanwhile on the front, the bust fullness is low, which causes pooling of the fabric near the underarm.

To counteract these fitting problems, the back pattern piece needs to be lengthened at the neck and armscye. The front pattern piece needs to be shortened only at the armscye. On my frame the armhole felt like it was the correct diameter. That told me that the same amount needed to be added/subtracted to the back/front to retain the diameter. To determine that amount I did the following...
-Unpick the basting on shoulder area so that the top and back were unattached.
-Tried the shirt on and moved the back overlap backwards until the drag lines on the front disappeared. Then pinned it in place.
- Took off the shirt and measured the distance between the back shoulder notch and the tip of the front neck binding.  On my muslin that measured 1.5"  With that information it was time to move on to the pattern adjustments.

How to Adjust Bronte for a Forward Shoulder and Hollow Chest.
Start with a forward shoulder adjustment to the back.
1. Draw a line across the shoulder overlap. I used the shoulder notch as a guide for my placement.

2. Cut the pattern apart on the line

3. Insert paper to make the overlap portion longer.  I added 1.5" to my pattern.   Tape the other part of the pattern on and use a french curve to true up the neckline.

4. Trim off the extra paper and the back piece is finished.

5. The back neckband needs to be lengthened to match the change made to the shoulder.  Cut it in half on the center fold line.

6. Add double the amount added to the back. So for my band I added 3".  Draw in a new center line and the back neckband is done.

Finish with the hollow chest adjustment.
7.  Draw a line perpendicular to your grain line across the upper part of the pattern.  Because the excess seemed to be pooling near the underarm I placed mine near the bottom of the armscye.

8. Draw another line parallel to the first at the distance that being removed. For my sample it's 1.5".

9. Fold the pattern so that the two lines touch.

10. Add some paper to your armscye and use a french curve to true up the seam.

11. Cut off the paper and all the pattern edits are done.

Note - You can also do a forward adjustment to the sleeve. Tutorial for that here. I was lazy and skipped this step, figuring the knit fabric would disguise the problem.

Confessions/Advice
- I neglected my sway back adjustment again.  Wow, denial on that fitting problem runs deep.

- This jersey is lighter weight than than recommended by the pattern. That does lead to some "draping" in the front.

- I used my normal 1/4" seam allowance rather than the suggested 3/8".

Husband Comment
"Is that a fancy onesie?"

My Final Thoughts
Had to work for this one, but it was worth it in the end.  Besides if everything goes well you don't get to bask in the "successfully triumphed over fitting problems" warm, fuzzy feeling. Ahhhh feels like velvet.
I found the Bronte pattern to be well formatted and the directions well written. It's a nice beginner pattern construction wise and not having to do a circular neckband insertion was a welcome change of pace. I'd recommend it to anyone who like vintage influenced looks.

Now don't you guys worry about that abandoned Lillestoff Bronte, I got plans of it. Muhhhhaaaa *Rubs hands together evilly*

Say Hello to Capital Chic Patterns

6.26.2014

I'm always excited to find out about a new pattern company, because it means there are even more pretties to add to my collection. So it was no surprise that I yelled "Yes, Yes" when Sally of Charity Shop Chic contacted me about a new line of patterns she was starting. MOAR Patterns!

Sally's new line of patterns is called Capital Chic and focuses on work wear, cocktail wear and day-to-night looks.  The first collection features 6 patterns with clean lines and a modern style aesthetic.  The patterns are available as print-at-home and print-at-copyshop PDF files. You can check out the whole collection over at captialchicpatterns.com.

Disclaimer time - Sally gave me the option of testing what ever patterns caught my fancy for free, in exchange for my feedback. The two patterns I chose to test were the cocktail dress Martini and the button up blouse Bellini.   I also used it as an excuse to buy a bunch of fabric. Sorry stash busting pledge.  I tested the beta versions of the patterns, however no major changes were made for the final version. So what you see in my sample garments is what you'll get in the purchased version. OK, now on to the fun stuff.

Martini -  Have I ever told you that I'm secretly a cocktail dress junkie?  It must stem from some past life hobnobbing with Don Draper at ritzy bars.  Oh Don, you're such a cad, now bring me another cocktail. Being a fictional character, Don never did bring me that drink. That's OK, I sewed myself a martini instead.
Martini can be sewn as a one-piece dress or a two piece pencil skirt and crop top combo.  I chose the one piece dress version because "my girls" would be working overtime trying to exit the bottom of the crop top. They're sneaky like that. The one piece dress still gives you the illusion of wearing a separate top without having to worry about the effects of gravity. Seems like a win win to me.
One thing that really impressed me about Sally's patterns is that they are designed to be as pretty on the inside as on the outside.  On Martini both the bodice and skirt are lined and then attached together with a french seam at the waist. The dress also has the detail of a zipper shield for the invisible zipper. I'll fully admit that I'm not a big sticker for finishing beyond overlocking. (*cough* lazy *cough*) But these kind of touches were appreciated by me as an experienced dressmaker.
Details you might like to know
Fitting - As someone with a bottom heavy hour glass figure, very little fitting was needed on this pattern. The skirt portion fit perfectly with no changes.  Due to my low set bust I had to lengthen the bodice by 1" to keep the bottom of the crop top below the girls.  I also made my standard fitting adjustments of 1/2" forward shoulder and dropping the bodice darts an 1".

Sewing confessions - I only skimmed the directions before choosing fabrics and didn't realize that the CB of the bodice self fabric is not attached to the zipper.  Probably would have chosen a black lining instead of cobalt if I'd known that. Oops (I did read the directions later, cause that's good testing and froggie was holding a ruler in a threatening manner.)
I love the textured ginkgo print suiting used for this sample, but it does not hold a press at all. That makes all the edges of the garment fluffy instead of my preferred crisp look.


Bellini - I also wanted to sew up one of the more causal patterns. You know, something a stay at home mom actually needs in her wardrobe. It also let me buy this cherry print broadcloth from Fabricmart. Cherries girls, Cherries!
Bellini is described as a loose fitting blouse with cap sleeves. While it has no darts, it still skims the body in a flattering manner. Bellini comes with two collar options, a straight collar and a scalloped one.  The scalloped one sold me on the pattern, but sadly it just didn't look right on me.  No matter, straight collars and I always get on.
Just like a Martini the insides are pretty, pretty.  Both the shoulder seams and side seams are sewn as french seams.  The armholes are finished with bias binding and the collar completely encloses the seam in a clean finish.
Details you might like to know
Fitting - Due to the looser fitting style, I didn't need to make many fitting adjustments on this pattern either.  I made the standard for me adjustments of  1/2" forward shoulder and 1/2" sway back. Looking at the finished garment I could have used a larger sway back adjustment  The shirt was also lengthened 5/8" for personal preferences.
Sewing confessions - Had this not been a pattern testing garment, then I would have added a side seam bust dart.. I think a little dart shaping on the front helps garments hang better on my body.

This garment was the first time I played with the buttonhole attachment on my snazzy Bernina 350.  In my excitement I made them a little too far away from the edge. Whoops.  It's good to know I'm human, right? ;)

To celebrate the launch of Capital Chic Patterns I'll be giving away a digital copy of the Martini pattern. To enter leave a blog comment and your information in Raffelcopter, so I have information to contact you if you win.  The drawing will run from 6/26/2014 till 7/3/2014.  Till then enjoy a candid of the Martini dress in action. The boy says we must DANCE!

a Rafflecopter giveaway

My Sundress Sew-a-long plans

6.23.2014


Confession time - I've had a really hard time deciding what pattern to choose for my own sew-a-long.  Doesn't that count as an internet party foul or something? Confession to the confession, I did know what I wanted to sew, but had neither the pattern or the fabric.  It was a Colette Hazel out of this fabric from Miss Matatabi. Warning: this fabric store is extremely dangerous. Don't click if you have weakness for Japanese fabric, least you spend all your grocery money on double gauze. I don't want any emails from husbands complaining about having to eat cold beans out of a can for a week.
OMG those bears. Look at him hug that fish right before he rips it's head off.
But we're supposed to be stash busting around these parts, so I had to give myself a stern talking too.  "Listen here Heather, there are plenty of fabric and patterns in this house. Pick one of them and deal."  Ok then "wet blanket but ultimately wise Heather", guess I'll pull out the Cambie pattern.
Oh hello there. A little late to the party aren't we?
Ahh yes the Cambie pattern which I erroneously left off the pattern inspiration posts. Bad blogger, no cookie. However I did put it on my summer sewing post, paired with this fabric.
I'm a little concerned about what that guy is doing to a sheep over on the top left.
A straight up Cambie with no design changes still sounds good buuuuuut...... I might have fallen in love with the bodice of this modcloth dress.
Don't you want me baby? Don't you want me Whoaaaa ooo?
Mmmmm sweet heart neckline/princess line bodice with straps, you complete me.  I wouldn't mind knocking off the whole dress actually.  There's just that pesky measurement imbalance between my front and back waist circumference that makes even pleats + properly fitting bodice impossible. A circle skirt might work just as well for my purposes.

Well, I'd better make my style decisions and get going because there are already finished sundresses in the sew-a-long group. You guys have been busy little bees. :)

MMI Blogs used the Pendrell blouse pattern as a base to draft a sundress. Here she is keeping cool while watching the world cup. More info on it on her Kollabora page.
Cher Sews whipped up a sleeveless Lady Skater in the most summery stripe combo possible. She might be convincing me that orange is a neutral. More info over on her blog.
Lady Skater

Great dresses ladies! Thanks for sewing along with me. :)

Coming to an imaginary theater near you.....

6.18.2014

(Beginning of movie voice over by that guy who does all the "In a world..." movie trailers.)
In 2009 John Rambo was killed by terrorists, but not before the government had taken samples of his DNA. Concerned with homeland security, the government assembled a crack team of scientists and tasked them with top secret project "First Blood." The goal of the project was to clone fully grown super soldiers from Rambo's DNA. *The project was going well until a fluke lab accident damaged the Y chromosome on the source DNA.  Unable to make carbon copy clones of John Rambo, the team came up with a different plan. They would make a female super solider, one that was as good with a gun as she was with a needle.......and so Jessica Rambo was born.

(Cut to first person narrative from our hero Jessica Rambo)
Returning to my quarters from a kali training session, I found a message from central command.  Major Seamstress Erin had sent down orders for my next assignment. I was to join the top secret mission classifed as The Rambo Project.
Command would be sending me a turban from one of my "father's" prior missions in order that I create suitable garments for tracking down my next target. More instructions were coming in the mail so be prepared.  I cleaned my gun and sharpened my Gingers, now I was ready for anything.

The package arrive a few days later containing 3/4 of a turban and a note written in code to inform me to my next target.  As I removed the turban from it's wrappings I was stuck with a sense of deja vu. Hadn't I seen this turban being worn before?  Had I ripped it into pieces with my gunfire?
A hazy image flickered in my mind.....but no, that wasn't me. No matter, I had orders to obey.
My fabric yardage was limited but I'd make it work, just like Sargent Gunn had always told me. My brain rifled through the possibilities and it became clear that there was only one that would serve my needs. I was a warrior queen and would dress like one.  I ordered Private Froggie to get out the pattern from the Craftsy Bombshell dress class.  A little extra explosive power comes in handy in my line of work.
We worked through the night, carefully considering stripe placement and irregularities in the fabric.  Private Froggie threw his paws up in the air in disgust more than once, but I told him not to despair. **Once you've had to make garments out of stockings and clear vinyl, then turban garments are a cake walk.
My original plan was to attach shorts to the bustier, for those times I have to run through the jungle exchanging sniper fire with masked bandits. Sadly, it was discovered that there was not enough yardage to cut shorts that would cover my "muscular" backside.  Private Froggie and I did some quick calculations and drafted up a mini skirt that would make the most of our remaining fabric.
After sewing the skirt to the bustier and putting in a zipper, I sent Private Froggie off to fill up my bandoleers. One with bullets, the other with red lipstick. While he was doing that, I made up a bustier lining and sewed in featherlight boning to help the garment retain it's shape.  My plastic boning stores came up a bit short, so we had to close up the lining and hope for the best.
I put on my poisoned red lipstick and shoes with hidden knives in the soles to go get photographic evidence that the first part of my mission had been completed. Private Froggie stopped me and said that the ensemble was missing one thing. He pulled out a red head band and I knew he was right, a true Rambo always wears red.
As I tied on my head band I told Private Froggie to saddle up, it was time to hit our target.  Look out evil doers, we're coming for you.
Need more Rambo?  Check out the ladies who have already posted their Rambo projects.
Oona of OonaBalloona La Wrambette
Sonja of Ginger Makes - Swingy Summer Top
Shams of Communing with Fabric – Jeans Style Jacket
Tempest of Fanbloomingtastic - John Rambo’s Worst Nightmare
Lauren of Lladybird - Slutty Bralette
Leila of Three Dresses Project- Hummingbird Skirt
Keep checking back on Seamstress Erin's announcement page for new links to go live.

* Blatant rip off of X-23. Sorry fellow Marvel fans.
** True story, I had a college course similar to the Project Runway challenges where they have to make garments out of candy or random things you find at the store. Sadly I have no photographic evidence of these garments.

Sundress Sewing Link Round-up

6.16.2014


Happy Monday everyone, it's the official start to the Sundress sew-a-long. Hooray! What better way to get started then to round up of helpful sewing tutorials. I've selected several that have been helpful to me in the past and some new ones that seemed perfect for sundresses. Now open your gray cells for a little learning. ;)

1. Fabric a little bit too sheer? Underline all the things with Sewaholic.

2. Wanna replace those pesky neck and armhole facings with piping? Gertie breaks down the steps here.

3. If piping is not to your liking, then how about a some bias bound necklines and armholes. Jen will help you sew them nice and flat.

4.  Are you looking to add underwires to a bustier style sundress? Gertie is here to support you.

5.  Sewing spaghetti straps driving you batty? Try this method from By Hand London and you don't even need a quick turn.

6. Maybe you'd like some braided spaghetti straps for your sundress. Colette shows you how to put together this cute detail.

7. Maybe you need a waist stay to give that strapless dress some extra support. Anne gives you the what and the why over on the Gorgeous Fabrics blog.

8. Ouch, that naughty zipper just bit you! Maybe you need a zipper shield a la Sewaholic.

9. Need some self covered buttons for your sundress? Laura shows you how to put those suckers together with no pesky metal show through on the Lilacs and Lace blog.

10. Is your sundress screaming for a matching belt?  Colette shows you how to whip one up in your left over fabric.

If you know of any other great tutorials, then let me know in the comments. I've love to learn some new stuff and maybe do another round up at a later date.  Alright then, guess I'd better go decide which sundress pattern is getting sewn up first!

P.S. - Had a twitter question this weekend asking if self drafted sundress patterns are OK for the sew-a-long. You betcha!

Summer Breeze makes me feel fine - Sundresses for Retro Chicks

6.13.2014


Hello Sew-a-long sisters, I'm back with my vintage inspired sundress picks.  You know I like a good retro inspired pattern even if I'm just a vintage dressing poser. Have a seat on the patio and and I'll get you a glass of long island iced tea, while we discuss the merits of princess line seams and halter straps. Then we can break out the red lipstick and decide how many shades a girl really needs.

1. Colette Lily - Some how elegant without being over the top fancy. It might be my favorite sheath style sundress.  Contrast bodice and pocket details, yes, yes, yes!

2. Butterick 6019 - Vaaaavooom! Sexy tiki dress, need I say more? "You know, it's dangerous for you to be in the frozen food section. Because you could melt all this stuff."

3. BlueGingerDoll Billie Jean - The perfect dress for picnics in the park.  I'm picturing one sewn up in some floaty cotton lawn for those hot summer days.

4. Vogue 8812 - Sure you could go to the beach party in shorts and a tee shirt, or you could go in STYLE! The gathered bust area paired with tiny spaghetti straps is fabulous.  Quick, someone find me some red plaid fabric, stat!

5. By Hand London Flora Flora's tank bodice option screams sundress to me.  Sewn up in some bright cotton it would be a cute dress for strolling around town.

6. Simplicity 1353 - Oh how I love you view A.  The full skirt with the sweetheart neckline just knocks my socks off.

7. Vogue 8789 What this old thing? I just wear it to do some heavy gardening. ;) Jokes aside, the possibilities of a bias bodice intrigues me. Such fun things you could do with a linear print motif.

8. Colette Hazel - I want to insert that old cover girl tag line, "Easy, breezy, beautiful..." cause that description fits Hazel to a tee. The perfect pattern for seersucker or gingham fabric.
On Monday I'll be doing a link round up of sewing techniques that may be helpful when sewing your sundresses. Till then why don't we have another refreshing drink and chill out to the mellow sounds of Seals and Croft. Summer breezes do make me feel fine.

Proudly designed by Mlekoshi pixel perfect web designs